Deck the Halls With This Wreath DIY

You’ll literally be decking the halls with boughs of holly via this new DIY project shared by Disney’s official fan-club D23. Follow a handful of easy steps and you’ve got the perfect arts and crafts project for your weekend!
So what are you waiting for? Let’s get crafting!

What you will need:
- Regular printer paper
- Seven (7) 9” x 12” sheets of bright green felt
- Two (2) 9” x 12” sheets of dark green felt
- 10“ embroidery hoop
- Red ribbon
- Small red craft pom poms
- Sharp scissors
- Hot glue gun with glue
How To Make The Wreath
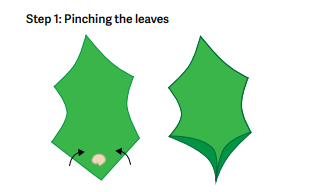
Step 1: Prepare the holly leaves
- Download and print out the holly leaf template and trim along the solid line.
- Cut a sheet of felt into three 4” x 9” pieces. Cut again into 2 1⁄4” x 4” pieces. You should have twelve 2 1⁄4” x 4” rectangles. Repeat this to all of the bright green felt sheets and one dark green felt sheet.
- Use the holly leaf template to cut out the leaves. TIP: To cut out the leaves faster, stack 3 pieces of felt.
- Apply a small amount of hot glue to the base of a leaf. Let the glue cool a few seconds, and then pinch the felt together. This area will be used to glue the leaf onto the embroidery hoop. Repeat this to all of the leaves.
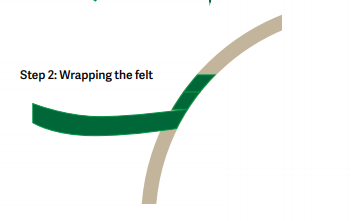
Step 2: Prepare the embroidery hoop
- Cut one dark green felt sheet into several 3⁄4” x 12” strips. These strips will be used to cover the embroidery hoop.
- Adhere with hot glue one end of a strip to the hoop and wrap the felt around the hoop to cover. Secure that strip with hot glue, and repeat until the hoop is covered.
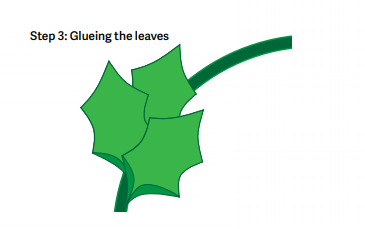
Step 3: Glue on the leaves
- Using bright green leaves, apply a small amount of hot glue for the first leaf position. This will be a center leaf. Keep in mind the wreath will be hung on a door or wall, so place the leaves on the front of the hoop.
- Apply another small amount of glue for the next leaf. This leaf will be to the left of the center leaf, about a 1⁄2” lower.
- Apply another leaf to the right of the center leaf, about a 1⁄2” lower than the left leaf.
- Apply another leaf in the center of the left and right leaves.
- Repeat these steps working around the wreath adding here and there a dark green leaf.
Step 4: Add the bow and red pom poms
- Using red ribbon, make a bow and glue onto the wreath.
- Glue on the red pom poms as holly berries.

You can download the instructions and the template for the leaves of your wreath here – D23-Felt-Wreath-Craft-r4
We hope we’ve managed to add a bit of merriment to your Christmas decorating! Readers are encouraged to keep following along with MickeyBlog for more fun ways to add a bit of Disney magic to your holiday season! We’ll also be coming to you LIVE! from the theme parks each and every week during the Yuletide Season!
Thinking about a Disney Getaway? Getting started is easy! Simply fill out our form below to get your FREE, no-obligation quote from MickeyTravels.
Find articles like this helpful? Then why not consider working with an Authorized Disney Vacation Planner? As an agent with MickeyTravels, I’ll be on hand to assist you with everything from finding your perfect package to helping you plan lots of special touches to make your visit truly magical. Best of all my services are absolutely FREE. Get in touch at 1.800.801.4025 via email at mroden@mickeytravels.com or follow along on Facebook